|
|
|
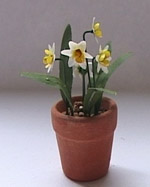
Paper Flowers
Making miniature flowers and plants from paper, while very fiddly, is also a lot of fun.
On this page you will find lists of the tools and supplies needed, basic techniques and an illustrated daffodil tutorial.
Ball stylus tools,
large, medium, small & extra small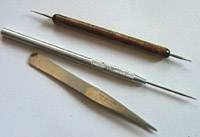
Needle tool
Upside down computer mouse matt
Tweezers
Plastic Palette (for mixing paints and glue)
Fine paint brushes
Sharp scissors
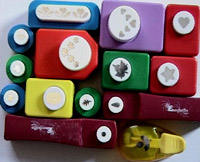
Craft Punches - see picture below:
Florists wire, 26-32 gauge (32 is the thinnest, 26 the fattest)
Floral foam stuff for flower centers, various colours
Coloured Paper, thin as you can
Rice paper
Confetti paper
Tracing Paper
Dolls house scale gravel (old coffee grounds, ground up tea leaves, basically anything fine and brown)
Tacky glue (must dry clear)
Plasticine (for sticking stems in to dry)
Air dry clay (for filling pots)
No hole beads, various colours (for berries and flower centers)
Acrylic Paints
Florists tape (browns and greens)
Spray Varnish (matt and gloss)
Extras:
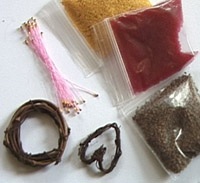
Tiny stamen for flowers
Laser cut leaves/flowers
Various pots and planters
Tiny grape vine wreaths
Artists Chalk
Coloured masking tape
1) Branches/stems from florists tape
 Cut
a length of florists tape about 2cm long. This stuff at first glance doesn't
look very interesting, kind of thick, coloured, no sticky sellotape, but once
you stretch and twist it you'll see it's possibilities.
Cut
a length of florists tape about 2cm long. This stuff at first glance doesn't
look very interesting, kind of thick, coloured, no sticky sellotape, but once
you stretch and twist it you'll see it's possibilities.
Make two cuts half way down the floral tape, then twist the tape to make three small stems. Twist the uncut part as well and you should have something reassembling a branch.
If you trim the two outside stems slightly and then attach a couple of leaves, you'll have a perfect little piece of foliage.
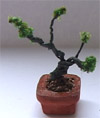
You can also use this twisting method to make miniature bonsai trees. Just take a 32 gauge piece of florists wire and twist this around the floral tape and you can shape the tape into tiny tree shapes. Dip the ends of your tree into tacky glue and then fine green floral foam stuff to make the foliage, place in a little pot with a bit of gravel and you should have a little tiny tree.
2) Shaping flowers
This is one of the basic techniques you will need to master before you can create your one tiny flowers.
Take your punched petals and place on an upside down mouse matt (foamy side up). Take a ball stylus tool (you could use an empty ball point pen for this but the ball stylus tool makes life a lot easier), you first need to slightly moisten the petals, then you gently run the stylus tool over the petal till it starts yo curl.
That is the basic, for trumpet type flowers you will need to press harder, till the petal sinks into the mouse matt and forms a cup around the tool. For simple petals you just need to run the tool around the top edges of the petals so they gently curl.
Some types of paper require more moisture than others, less is more though, if you get them too wet they have a tendency to tear, so take it gently.
Once the petals have dried they should keep their shape and are ready for attaching to stems.
3) Veining leaves
To make punches leaves look more lifelike you should first shape them using the techniques above, then turn the leaf over and gently run a needle over the center of the leaf to create a slightly indented vein.
Take a close look at a picture of the plant you are trying to create and attempt to copy the veining, don't get too carried away though, we are just looking for a suggestion of the details, don't try to recreate every vein, just the main features.
4) Making tiny Stamen
This is one of my favourite parts, very quick, very simple and can add lots of interest to your plants.
Trim some very fine (32 gauge) florists wire into short lengths (around 2cm). Mix up some paint the colour you want your stamen to be with some tacky glue (50/50) and dip the wire into the glue paint mixture. This should leave a small pip of the colour on the end of your wire. Stick the wire in some plasticine to dry.
You may want to add another coat to make the stamen more prominent for some plants, but try to keep it to scale and remember stamen are usually tiny.
5)Using floral foam for flower centers
Some flowers have a kind of fluffy center form loads and loads of tiny stamen. To recreate this the easiest way is to put a tiny blob of glue in the center of your flower and dip in the finest floral of in the correct colour for you flower. You will probably have to squish it down and shape it a bit using tweezers and a needle tool to perfect the look.
6) Making masking tape leaves
Lay a couple of inches of masking tape onto your work table, sticky side up then place a fine piece of floral wire down the center of the masking tape, lengthways. Fold the tape over, covering the wire
Cut leaf shapes from the wired tape. Colour the tape with markers or paint and then arrange finished greenery in a container.
 You
will need:
You
will need:
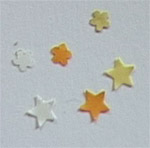
A tiny star shaped
craft punch
A small flower punch
or circle punch
20 3cm pieces of 32/30 gauge florist wire
Green, yellow, white and orange paper
Tacky Glue
Matt spray varnish
A small pot or basket
Some dolls house scale gravel or old coffee grounds
Air dry clay or plasticine to fill the pot
Scissors
Tweezers
A sharp needle or pin
Medium ball stylus tool
An upside down mouse matt
A steady hand and some patience....
1) First punch out your petals, you'll need about 8 stems to fill a small pot so punch out 8 stars and 8 small flowers/circles. The colours are up to you but I think a nice mix looks good so I'd make some dafs white with a yellow trumpet, some yellow with yellow and some orange with yellow. Punch according to your own colour scheme.
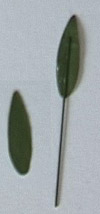
2) Next the leaves. I haven't yet found a punch for these so I just use nice sharp scissors and cut them from green paper (see dia). Make about 10 of these and with a little bit of glue stick each one to a piece of wire, again see the diagram for detail. Stick these into a piece of plasticine to dry.
3) Stamen, like I say I love doing these. Mix up your paint, I use yellow acrylic for dafs, with some tacky glue and dip lengths of wire into the mix to make little pips. The stick them in a lump of plasticine to dry.
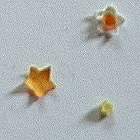
4) Now you need to shape your flower parts. Spread out all the punches pieces on your mouse matt. Wet one of the star shapes with a paint brush and dab with your finger tip. Take the medium ball stylus tool and gently work into the pointy bits to make the slightly curl, then press gently in the center so that the whole star is slightly concave.
For the trumpet parts you need to moisten as before and then gently push the ball in the center of the shape and roll around lightly until you have formed a cup shape.
Take one star shape and lay the cup upwards, then add a tiny dab of glue in the center. With your tweezers pick up a trumpet and place onto the glue.
When the flower has dried together take a pin and make a hole through both parts of the flower. Do this on a solid surface or the flower will warp.
5) Take one of your dried stamen and pain a little glue under the pip around the wire. With your tweezers pick up a completed flower shape and push the other end of the wire through the hole in the flower (cup upwards). Gently push until the pip is inside the trumpet then place in plasticine again for the glue to dry.
Do this for each of your eight flowers.
6) When all the flowers have dried take your tweezers and gently bend the wire just below the flower so that the flower faces forward rather than up.
7) Now it's time to put it all together. Take you pot and put some air drying clay or plasticine in the bottom, drip on a little layer of glue and scatter your soil on top. Then take your blooms and leaves and plant them in this pot.
You may need to trim the wire a little to make it the right length for the pot but this is up to you. Arrange all the flowers and leaves in your pot and then give it all a good spray with matt varnish.
8) Admire your handiwork and show all your friends!
 Supplies